
【msprobe】昇腾dump精度工具使用以及veRL使能方法
随着大语言模型技术的迅速发展,尤其是在诸如ChatGPT、DeepSeek等应用的引领下,大模型迅速成为AI界的研究热点。大模型训练需要强大的算力支撑,涉及数据、模型、框架、算子、硬件等诸多环节和技术层面。由于模型规模巨大,训练过程复杂且多变,经常出现精度问题。训练精度问题是多种因素共同作用的结果,主要表现为训练收敛不及预期,如Loss不对齐、NaN、尖刺、下游任务效果变差等。一般可分为模型精度问
作者:昇腾实战派
背景介绍
随着大语言模型技术的迅速发展,尤其是在诸如ChatGPT、DeepSeek等应用的引领下,大模型迅速成为AI界的研究热点。大模型训练需要强大的算力支撑,涉及数据、模型、框架、算子、硬件等诸多环节和技术层面。由于模型规模巨大,训练过程复杂且多变,经常出现精度问题。
训练精度问题是多种因素共同作用的结果,主要表现为训练收敛不及预期,如Loss不对齐、NaN、尖刺、下游任务效果变差等。一般可分为模型精度问题和数值精度问题。
- 模型精度问题:主要指模型从数据集中读取的数据、模型的训练超参数、模型结构甚至框架本身设计或使用过程等出现问题。模型精度问题对收敛有非常大的影响,需逐项仔细排除、分析,并结合实际情况进行调整。
- 数值精度问题:主要指由于浮点数计算过程的有限字长效应、计算序、通信序或各种计算的数学表达式所带来的近似误差。计算数值的近似性一定概率上会影响模型的收敛性,但不能简单地认为计算过程差异一定会导致模型收敛出现问题。算子的数值精度是计算过程的基础,通常认为算子精度问题是大模型精度问题的来源之一,需要引起重视。但由于实现过程差异,不同硬件(如GPU和CPU之间,GPU各版本之间)同样的计算过程,数值计算结果通常会有一定差异,在特定容限范围内,不会影响模型最终收敛。
在遇到精度问题时,精度工具的重要程度不言而喻,这篇文章给大家讲讲华为昇腾的msprobe工具基本的使用方法以及在Verl框架里面实战该如何配置。
工具安装
pip install mindstudio-probe
精度采集工具使用
使用精度采集工具需要先配置config.json文件
下面介绍两种最常用的配置
1.采集指定步的统计量
{
    "task": "statistics",
    "dump_path": "/home/data_dump",
    "rank": [],
    "step": [0,1],
    "level": "mix",
    "enable_dataloader": false,
    "statistics": {
        "scope": [],
        "list": [],
        "data_mode": ["all"],
        "summary_mode": "statistics"
    }
}
2.采集指定步的tensor值
{
    "task": "tensor",
    "dump_path": "/home/data_dump",
    "rank": [],
    "step": [0,1],
    "level": "mix",
    "enable_dataloader": false,
    "tensor": {
        "scope": [],
        "list":[],
       "data_mode": ["all"],
        "backward_input": []
    }
}
此外,在这两种配置基础上常见的几种修改为:
- 采集级别:修改level采集"mix"(API+模块级)、“L0”(模块级)、“L1”(API)。
- 统计量+md5:修改统计量中的"summary_mode"为 “md5”。
- 指定采集步数(或卡号):修改"step"(或"module_ranks"),[]代表采集所有,内有数值代表采集该步,多步用英文逗号分割。
- 筛选目标API,具体有如下两种方式:
修改"list"属性,添加时会采集名称包含该字符串的所有API或模块,多个采集对象用英文逗号分隔,若字符串为模块类型则展开内部API进行同步采集。
修改"scope"属性,添加开始和结束的API或模块,可采集两者之间的API或模块。
更详细的配置修改指南可看这篇文章:mstt/debug/accuracy_tools/msprobe/docs/zh/dump/config_json_introduct.md · Ascend/mstt - AtomGit | GitCode
更多的配置参考可看这篇文章:mstt/debug/accuracy_tools/msprobe/docs/zh/dump/config_json_examples.md · Ascend/mstt - AtomGit | GitCode
Verl工具使能
Megatron后端
文件地址:./verl/workers/megatron_workers.py
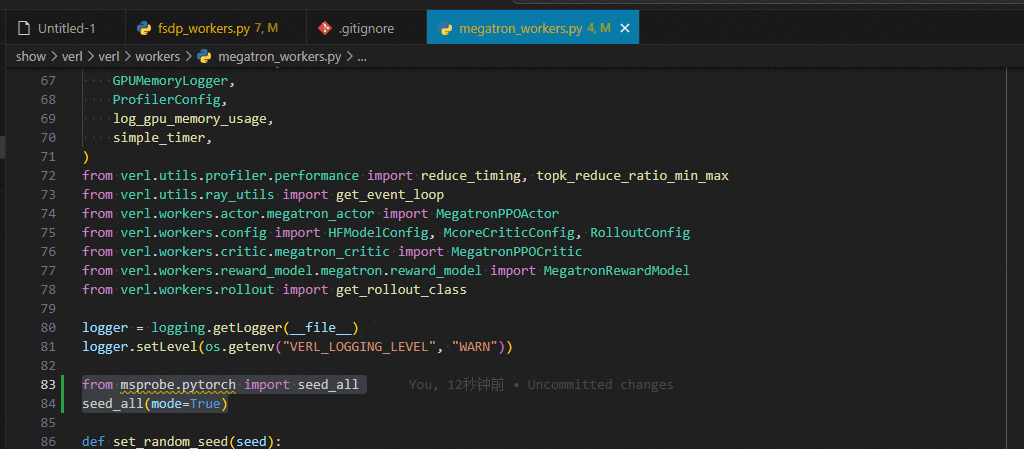
使能确定性
from msprobe.pytorch import seed_all
seed_all(mode=True)
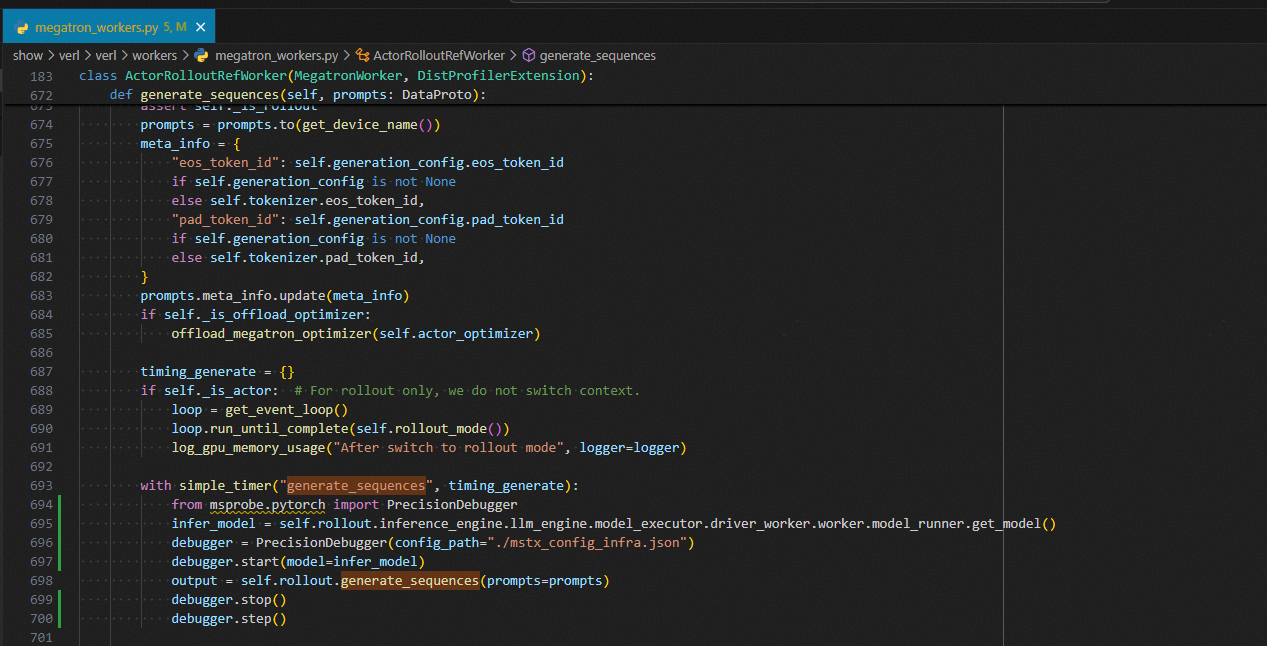
generate_sequences
with simple_timer("generate_sequences", timing_generate):
    from msprobe.pytorch import PrecisionDebugger
    infer_model = self.rollout.inference_engine.llm_engine.model_executor.driver_worker.worker.model_runner.get_model()
    debugger = PrecisionDebugger(config_path="./mstx_config_infra.json")
    debugger.start(model=infer_model)
    output = self.rollout.generate_sequences(prompts=prompts)
    debugger.stop()
    debugger.step()
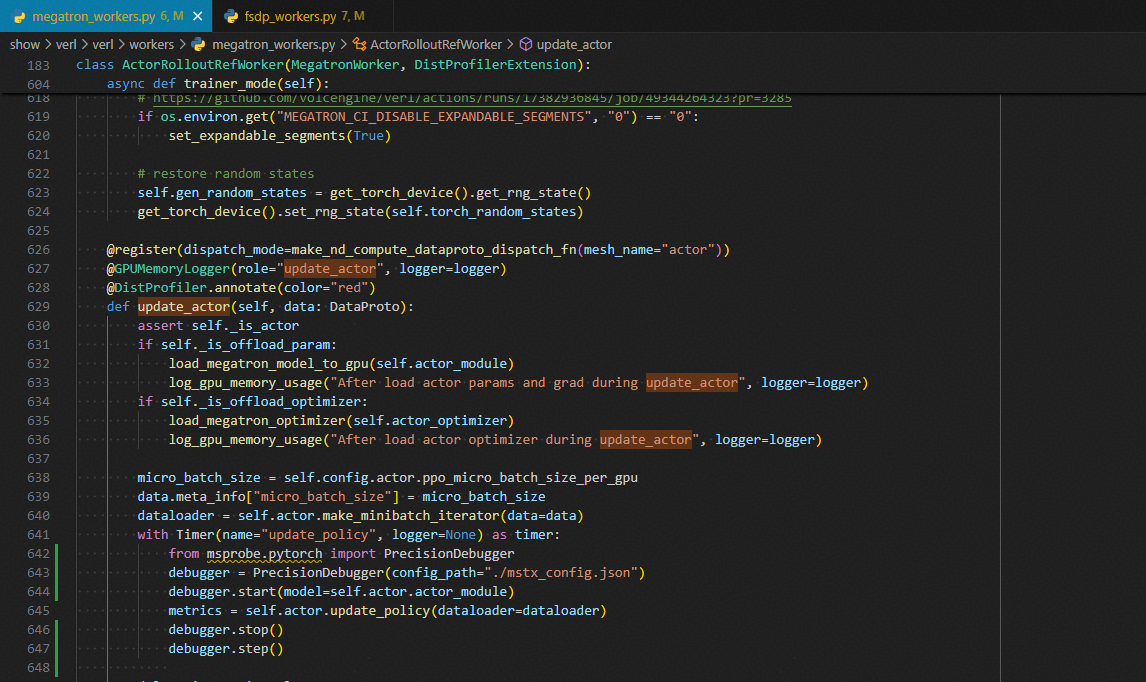
update_actor
with Timer(name="update_policy", logger=None) as timer:
    from msprobe.pytorch import PrecisionDebugger
    debugger = PrecisionDebugger(config_path="./mstx_config.json")
    debugger.start(model=self.actor.actor_module)
    metrics = self.actor.update_policy(dataloader=dataloader)
    debugger.stop()
    debugger.step()
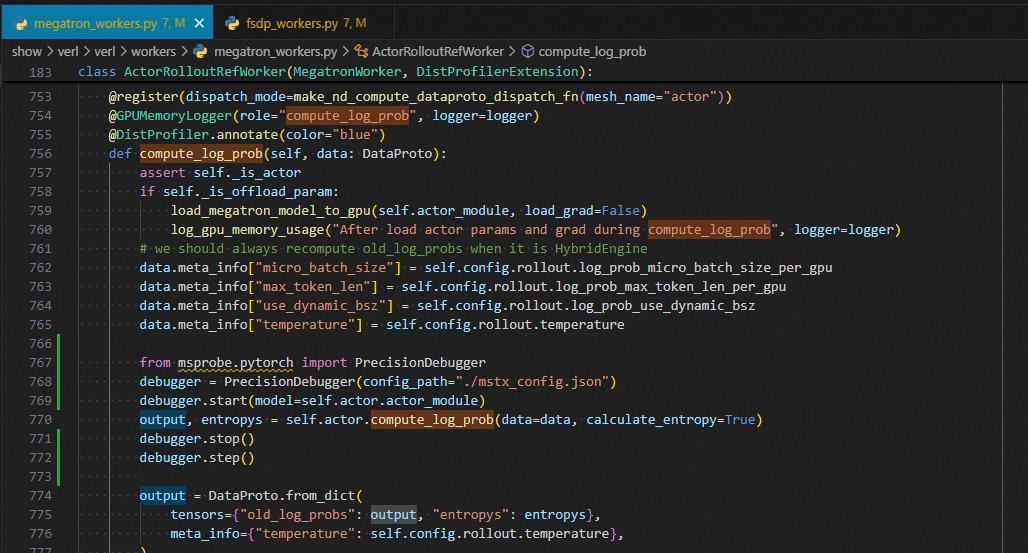
compute_log_prob
from msprobe.pytorch import PrecisionDebugger
debugger = PrecisionDebugger(config_path="./mstx_config.json")
debugger.start(model=self.actor.actor_module)
output, entropys = self.actor.compute_log_prob(data=data, calculate_entropy=True)
debugger.stop()
debugger.step()
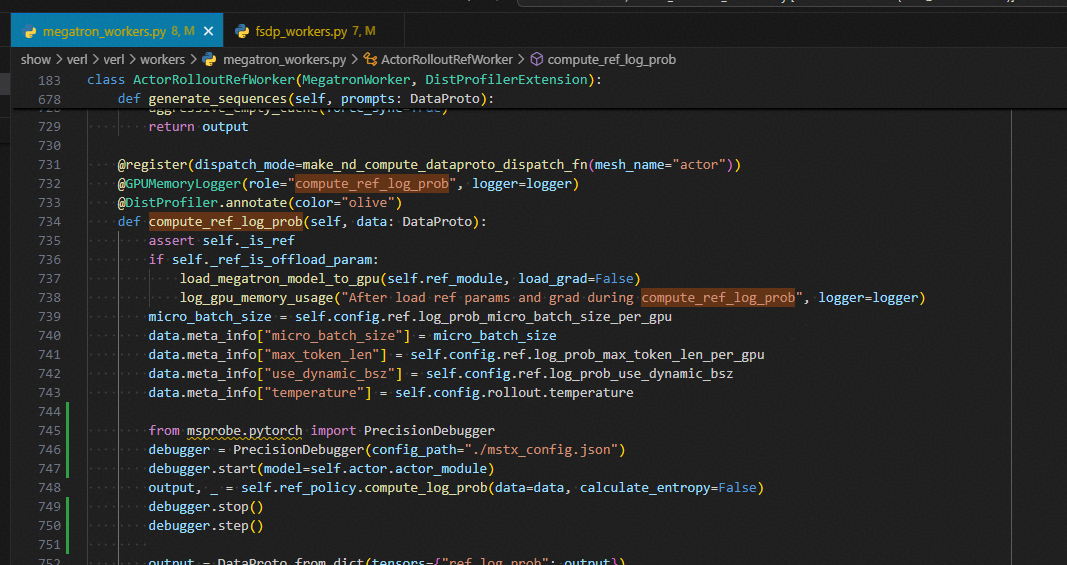
compute_ref_log_prob
from msprobe.pytorch import PrecisionDebugger
debugger = PrecisionDebugger(config_path="./mstx_config.json")
debugger.start(model=self.actor.actor_module)
output, _ = self.ref_policy.compute_log_prob(data=data, calculate_entropy=False)
debugger.stop()
debugger.step()
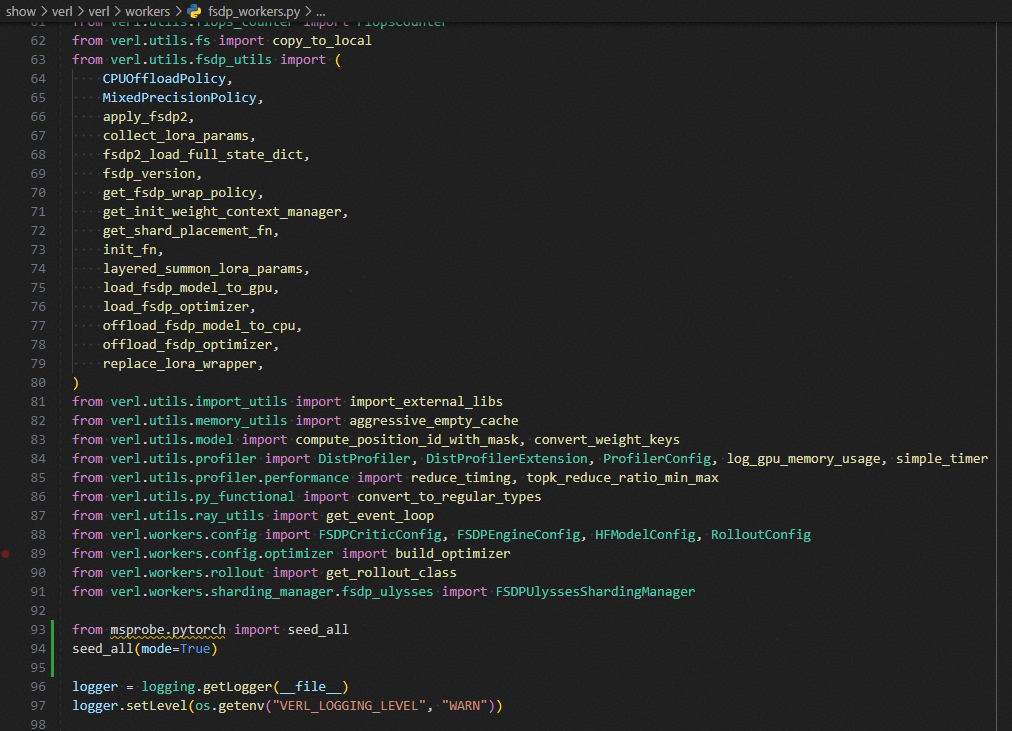
FSDP后端
文件地址:./verl/workers/fsdp_workers.py
使能确定性
from msprobe.pytorch import seed_all
seed_all(mode=True)
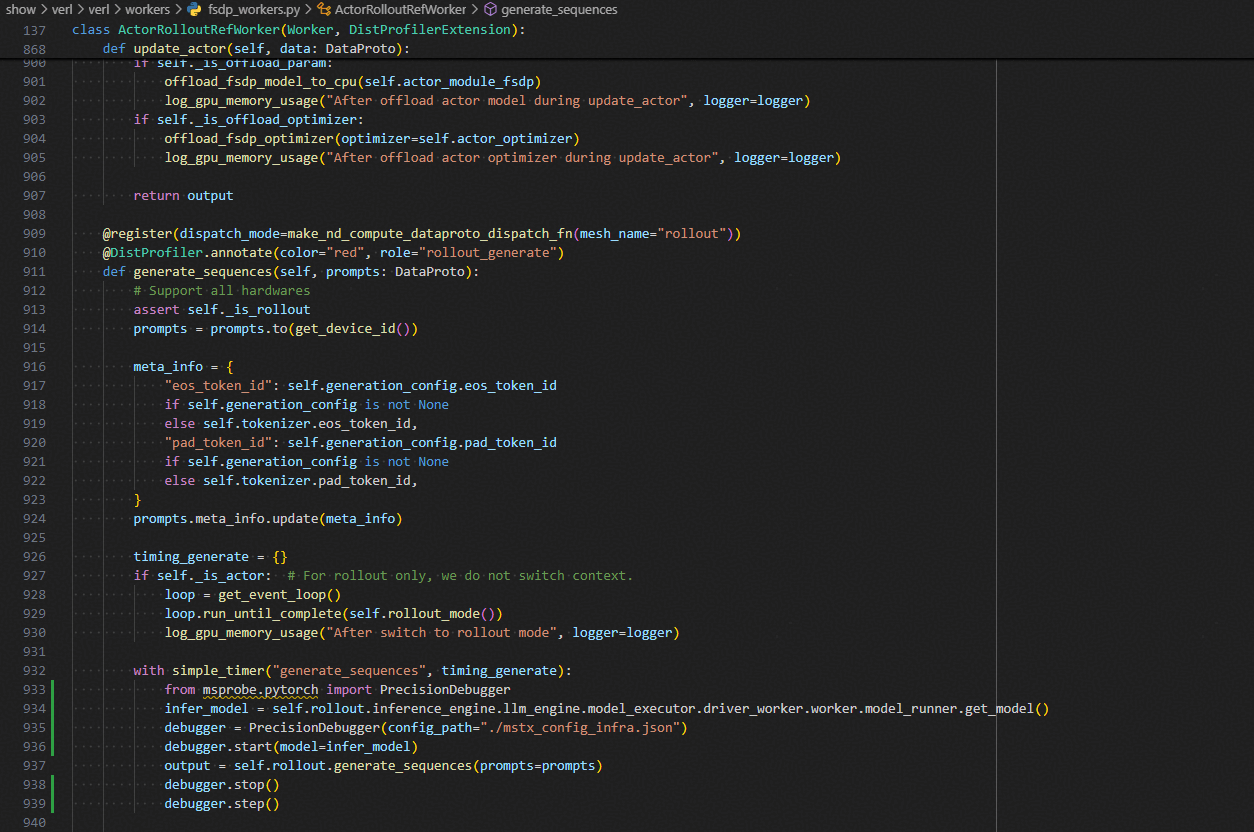
generate_sequences
with simple_timer("generate_sequences", timing_generate):
    from msprobe.pytorch import PrecisionDebugger
    infer_model = self.rollout.inference_engine.llm_engine.model_executor.driver_worker.worker.model_runner.get_model()
    debugger = PrecisionDebugger(config_path="./mstx_config_infra.json")
    debugger.start(model=infer_model)
    output = self.rollout.generate_sequences(prompts=prompts)
    debugger.stop()
    debugger.step()
update_actor
with Timer(name="update_policy", logger=None) as timer:
    from msprobe.pytorch import PrecisionDebugger
    debugger = PrecisionDebugger(config_path="./mstx_config.json")
    debugger.start(model=self.actor.actor_module)
    metrics = self.actor.update_policy(data=data)
    debugger.stop()
    debugger.step()

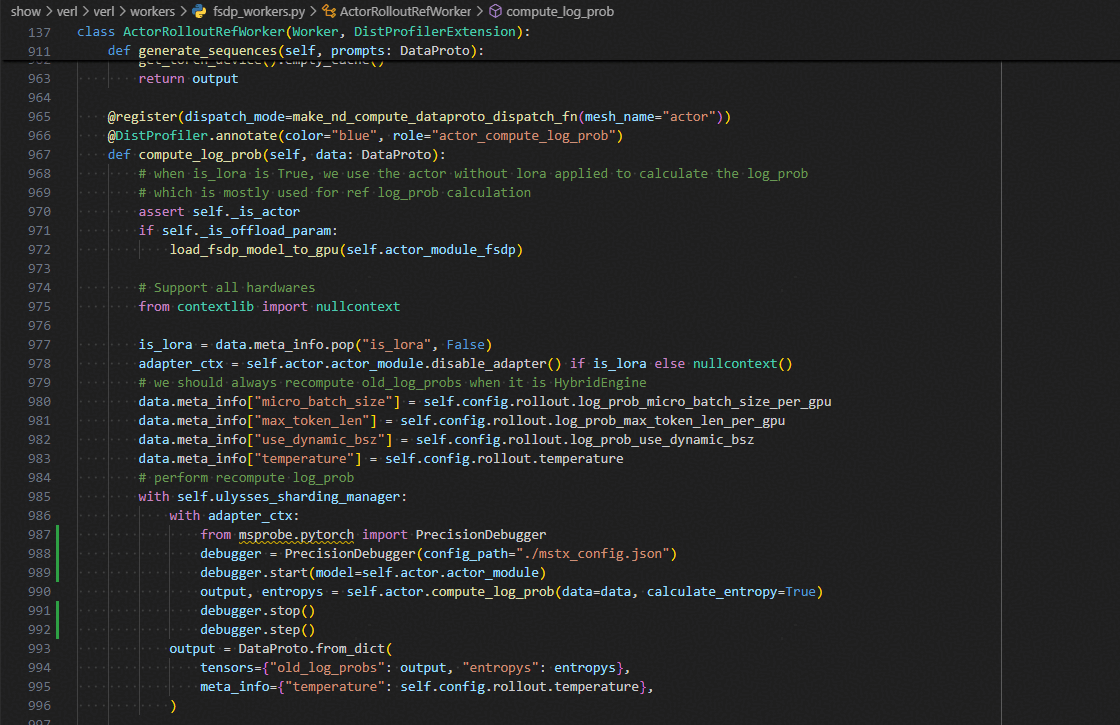
compute_log_prob
with adapter_ctx:
    from msprobe.pytorch import PrecisionDebugger
    debugger = PrecisionDebugger(config_path="./mstx_config.json")
    debugger.start(model=self.actor.actor_module)
    output, entropys = self.actor.compute_log_prob(data=data, calculate_entropy=True)
    debugger.stop()
    debugger.step()
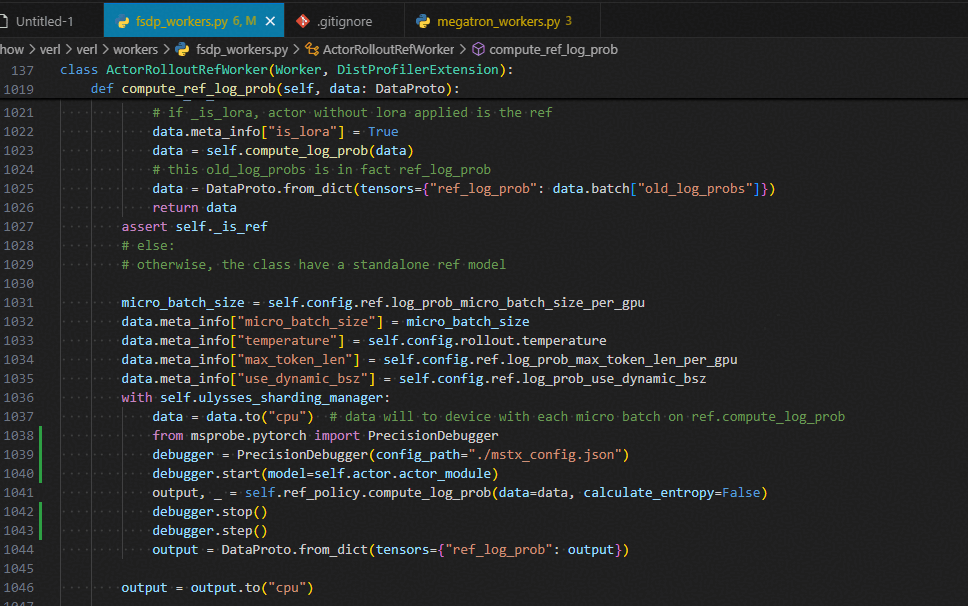
compute_ref_log_prob
with self.ulysses_sharding_manager:
    data = data.to("cpu")  # data will to device with each micro batch on ref.compute_log_prob
    from msprobe.pytorch import PrecisionDebugger
    debugger = PrecisionDebugger(config_path="./mstx_config.json")
    debugger.start(model=self.actor.actor_module)
    output, _ = self.ref_policy.compute_log_prob(data=data, calculate_entropy=False)
    debugger.stop()
    debugger.step()
    output = DataProto.from_dict(tensors={"ref_log_prob": output})
精度比对工具使用
对于已经通过精度采集工具在NPU和标杆上采集保存的统计量或tensor的数据,可以使用精度采集比对工具进行各评测指标的精度比对。
使用说明
使用精度比对工具需要先配置compare.json文件:
单卡场景示例:路径精确到json文件。
{
    "npu_path": "./npu_dump/dump.json",
    "bench_path": "./bench_dump/dump.json",
    "stack_path": "./npu_dump/stack.json",
    "is_print_compare_log": true
}
多卡场景示例:路径精确到step,下面需包含rank。
{
    "npu_path": "./npu_dump/step0",
    "bench_path": "./bench_dump/step0",
    "is_print_compare_log": true
}
比对命令
msprobe -f pytorch compare -i ./compare.json -o ./output -s
保存格式
比对后保存两类文件:
- advisor_{timestamp}.txt 文件,给出可能存在精度问题的 API 的专家建议。
- compare_result_{timestamp}.xlsx 文件,列出所有执行精度比对的 API 详细信息和比对结果,具体结果分析参照下文使用思路。

鲲鹏昇腾开发者社区是面向全社会开放的“联接全球计算开发者,聚合华为+生态”的社区,内容涵盖鲲鹏、昇腾资源,帮助开发者快速获取所需的知识、经验、软件、工具、算力,支撑开发者易学、好用、成功,成为核心开发者。
更多推荐

 16
16 0
0- 0


 已为社区贡献2条内容

所有评论(0)