
华为Altas 200IDK A2开发板 部署YOLOV8实现摄像头 实时目标检测
·
前言
华为Altas 200DK A2开发板自身提供了YOLOV5的测试demo,但开发者如果想调用YOLOV8进行目标检测,需要将其pt文件转换为om文件,同时修改运行代码,以下为项目经历分享
一、pt文件转om文件
1、pt文件转onnx
需要确保你的开发环境正常,在电脑上将训练好的pt文件转换成onnx文件,这里以官方的yolov8n.pt为例,转换代码如下:
from ultralytics import YOLO

# 加载模型
model = YOLO('yolov8n.pt')
# 导出模型
model.export(format='onnx')
2、onnx文件转om文件
将转换好的onnx文件放在华为Altas 200DK A2开发板的文件夹中,为方便演示这里我们放的位置是:
~/sample/notebook/01-yolov5
在该目录下打开终端,执行以下指令
atc --model=yolov8n.onnx --framework=5 --output=model --soc_version=Ascend310B4
如果显示以下示例,表示转换成功
ATC run success
如果转换失败,参考官方使用手册的模型转换章节:模型转换
二、yolov8代码配置
自带demo使用的yolov5代码为ipynb文件main.ipynb,一方面无法简单地通过修改文件(如将其yolo.om文件改成yolov8.om)实现yolov8部署,另一方面也不适用项目中的自启动设置,以下为修改后的demov8.py文件代码:
import ctypes
import os
import cv2
import numpy as np
from ais_bench.infer.interface import InferSession

class_names = ['person', 'bicycle', 'car', 'motorcycle', 'airplane', 'bus', 'train', 'truck', 'boat', 'traffic light',
               'fire hydrant', 'stop sign', 'parking meter', 'bench', 'bird', 'cat', 'dog', 'horse', 'sheep', 'cow',
               'elephant', 'bear', 'zebra', 'giraffe', 'backpack', 'umbrella', 'handbag', 'tie', 'suitcase', 'frisbee',
               'skis', 'snowboard', 'sports ball', 'kite', 'baseball bat', 'baseball glove', 'skateboard', 'surfboard',
               'tennis racket', 'bottle', 'wine glass', 'cup', 'fork', 'knife', 'spoon', 'bowl', 'banana', 'apple',
               'sandwich', 'orange', 'broccoli', 'carrot', 'hot dog', 'pizza', 'donut', 'cake', 'chair', 'couch',
               'potted plant', 'bed', 'dining table', 'toilet', 'tv', 'laptop', 'mouse', 'remote', 'keyboard',
               'cell phone', 'microwave', 'oven', 'toaster', 'sink', 'refrigerator', 'book', 'clock', 'vase',
               'scissors', 'teddy bear', 'hair drier', 'toothbrush']

rng = np.random.default_rng(3)
colors = rng.uniform(0, 255, size=(len(class_names), 3))

model_path = 'yolov8n.om'

conf_threshold = 0.5
iou_threshold = 0.4
input_w = 640
input_h = 640

def preprocess_image(raw_bgr_image):
    image_raw = raw_bgr_image
    h, w, c = image_raw.shape
    image = cv2.cvtColor(image_raw, cv2.COLOR_BGR2RGB)
    r_w = input_w / w
    r_h = input_h / h
    if r_h > r_w:
        tw = input_w
        th = int(r_w * h)
        tx1 = tx2 = 0
        ty1 = int((input_h - th) / 2)
        ty2 = input_h - th - ty1
    else:
        tw = int(r_h * w)
        th = input_h
        tx1 = int((input_w - tw) / 2)
        tx2 = input_w - tw - tx1
        ty1 = ty2 = 0
    image = cv2.resize(image, (tw, th))
    image = cv2.copyMakeBorder(image, ty1, ty2, tx1, tx2, cv2.BORDER_CONSTANT, None, (128, 128, 128))
    image = image.astype(np.float32) / 255.0
    image = np.transpose(image, [2, 0, 1])
    image = np.expand_dims(image, axis=0)
    image = np.ascontiguousarray(image)
    return image, image_raw, h, w

def rescale_boxes(boxes, img_width, img_height, input_width, input_height):
    input_shape = np.array([input_width, input_height, input_width, input_height])
    boxes = np.divide(boxes, input_shape, dtype=np.float32)
    boxes *= np.array([img_width, img_height, img_width, img_height])
    return boxes

def xywh2xyxy(x):
    y = np.copy(x)
    y[..., 0] = x[..., 0] - x[..., 2] / 2
    y[..., 1] = x[..., 1] - x[..., 3] / 2
    y[..., 2] = x[..., 0] + x[..., 2] / 2
    y[..., 3] = x[..., 1] + x[..., 3] / 2
    return y

def multiclass_nms(boxes, scores, class_ids, iou_threshold):
    unique_class_ids = np.unique(class_ids)
    keep_boxes = []
    for class_id in unique_class_ids:
        class_indices = np.where(class_ids == class_id)[0]
        class_boxes = boxes[class_indices, :]
        class_scores = scores[class_indices]
        class_keep_boxes = nms(class_boxes, class_scores, iou_threshold)
        keep_boxes.extend(class_indices[class_keep_boxes])
    return keep_boxes

def nms(boxes, scores, iou_threshold):
    sorted_indices = np.argsort(scores)[::-1]
    keep_boxes = []
    while sorted_indices.size > 0:
        box_id = sorted_indices[0]
        keep_boxes.append(box_id)
        ious = compute_iou(boxes[box_id, :], boxes[sorted_indices[1:], :])
        keep_indices = np.where(ious < iou_threshold)[0]
        sorted_indices = sorted_indices[keep_indices + 1]
    return keep_boxes

def compute_iou(box, boxes):
    xmin = np.maximum(box[0], boxes[:, 0])
    ymin = np.maximum(box[1], boxes[:, 1])
    xmax = np.minimum(box[2], boxes[:, 2])
    ymax = np.minimum(box[3], boxes[:, 3])
    intersection_area = np.maximum(0, xmax - xmin) * np.maximum(0, ymax - ymin)
    box_area = (box[2] - box[0]) * (box[3] - box[1])
    boxes_area = (boxes[:, 2] - boxes[:, 0]) * (boxes[:, 3] - boxes[:, 1])
    union_area = box_area + boxes_area - intersection_area
    iou = intersection_area / union_area
    return iou

def extract_boxes(predictions, img_width, img_height):
    boxes = predictions[:, :4]
    boxes = rescale_boxes(boxes, img_width, img_height, input_w, input_h)
    boxes = xywh2xyxy(boxes)
    return boxes

def process_output(output, img_width, img_height):
    predictions = np.squeeze(output[0]).T
    scores = np.max(predictions[:, 4:], axis=1)
    predictions = predictions[scores > conf_threshold, :]
    scores = scores[scores > conf_threshold]

    if len(scores) == 0:
        return [], [], []

    class_ids = np.argmax(predictions[:, 4:], axis=1)
    boxes = extract_boxes(predictions, img_width, img_height)
    indices = multiclass_nms(boxes, scores, class_ids, iou_threshold)

    return boxes[indices], scores[indices], class_ids[indices]

def draw_detections(image, boxes, scores, class_ids):
    for class_id, box, score in zip(class_ids, boxes, scores):
        color = colors[class_id]
        x1, y1, x2, y2 = box.astype(int)
        cv2.rectangle(image, (x1, y1), (x2, y2), color, 2)
        label = f'{class_names[class_id]} {int(score * 100)}%'
        cv2.putText(image, label, (x1, y1 - 5), cv2.FONT_HERSHEY_SIMPLEX, 0.5, color, 2)
    return image

def main():
    model = InferSession(0, model_path)
    frame_count = 0
    prev_time = 0
    cap = cv2.VideoCapture(0)  # 使用默认摄像头
    while True:
        ret, frame = cap.read()
        if not ret:
            break

        img, img_raw, h, w = preprocess_image(frame)
        outputs = model.infer([img])
        boxes, scores, class_ids = process_output(outputs, w, h)

        result_image = draw_detections(frame, boxes, scores, class_ids)
        # 初始化帧计数器和上一次的计数时间


        #cv2.imshow('YOLOv8 Real-time Detection', result_image)
            # 计算当前时间
        curr_time = cv2.getTickCount()

    # 更新帧计数器和时间
        frame_count += 1
        if curr_time - prev_time >= 1000:  # 每隔1000ms更新一次
            fps = frame_count / ((curr_time - prev_time) / cv2.getTickFrequency())
        # 更新帧率,并重置计数器和时间
            prev_time = curr_time
            frame_count = 0

        # 显示识别帧率
        cv2.putText(result_image, f'FPS: {fps:.2f}', (10, 30), cv2.FONT_HERSHEY_SIMPLEX, 1, (0, 255, 0), 2)
        cv2.imshow('Frame with FPS', result_image)

        if cv2.waitKey(1) & 0xFF == ord('q'):
            break

    cap.release()
    cv2.destroyAllWindows()

if __name__ == "__main__":
    main()
三、效果展示
运行代码:
python demov8.py
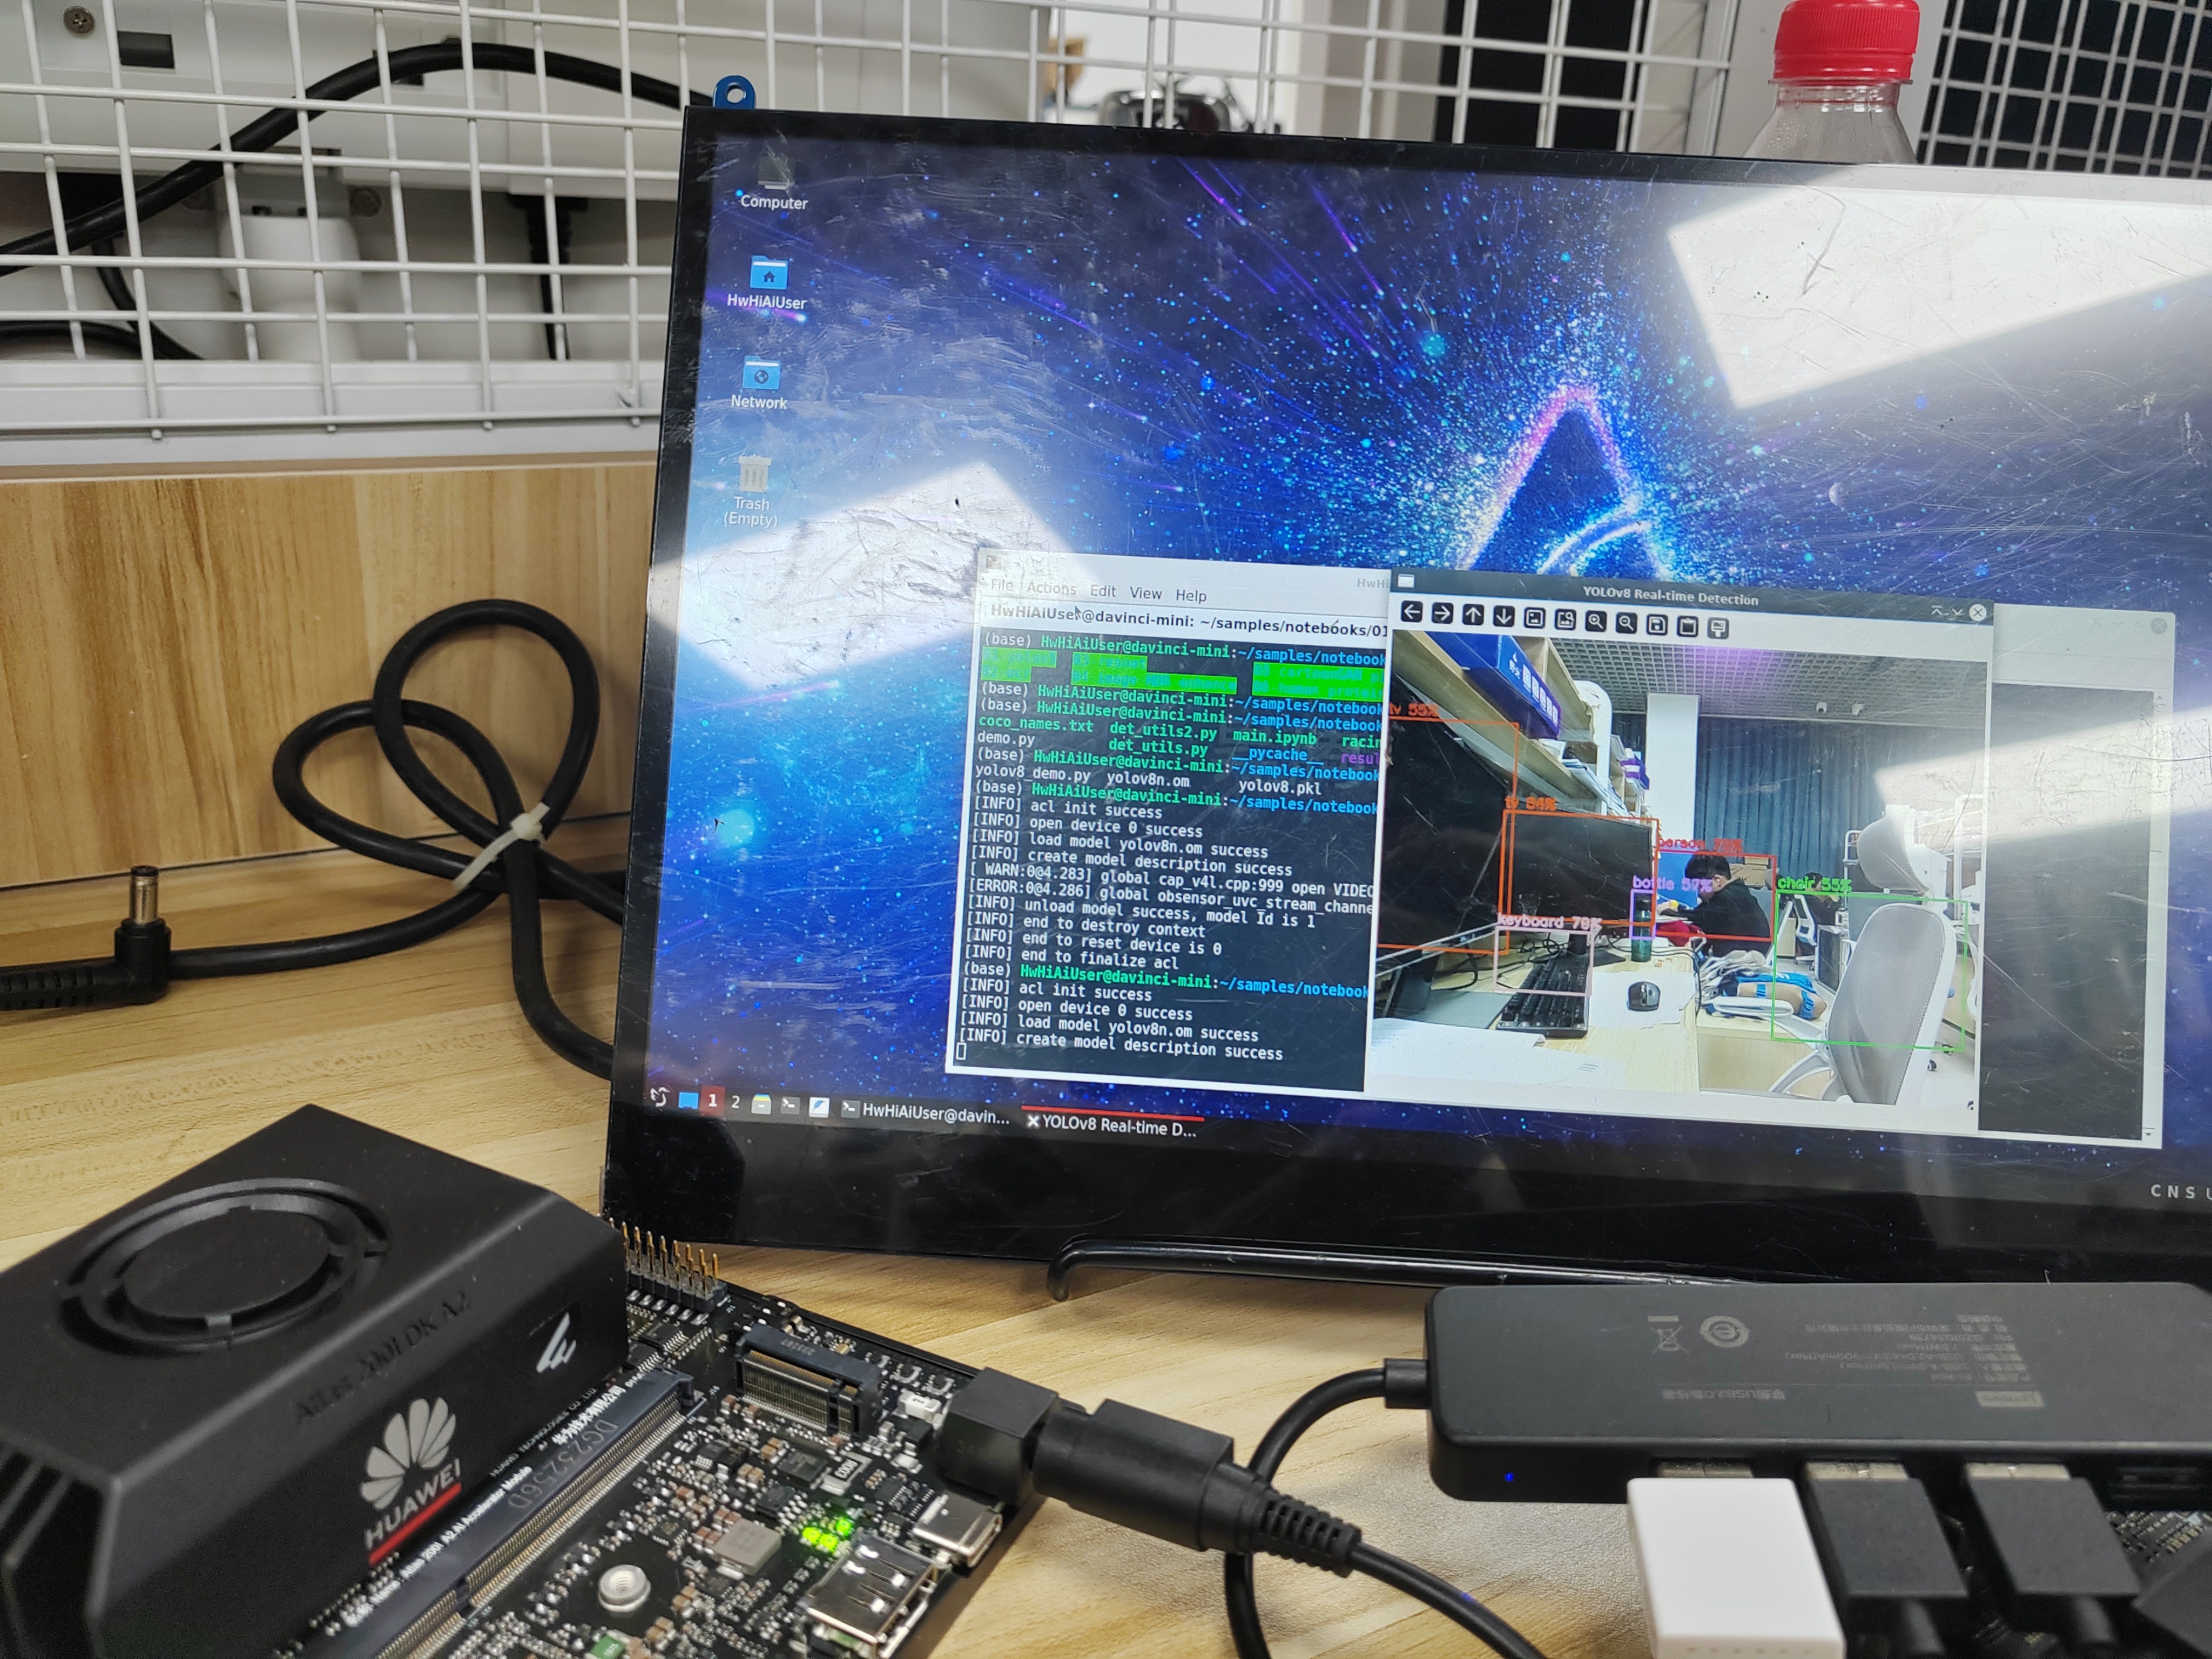
通过USB摄像头,可以实现实时目标检测,后续的代码添加了帧率计算,帧率接近30帧。
总结
本文主要是通过华为Altas 200DK A2开发板,运行转换好的om文件,实现针对摄像头的实时目标识别,是一次不错的实践经历,欢迎各位交流讨论。

鲲鹏昇腾开发者社区是面向全社会开放的“联接全球计算开发者,聚合华为+生态”的社区,内容涵盖鲲鹏、昇腾资源,帮助开发者快速获取所需的知识、经验、软件、工具、算力,支撑开发者易学、好用、成功,成为核心开发者。
更多推荐

 16
16 0
0- 0


 已为社区贡献1条内容

所有评论(0)