
在openeuler中安装、使用轻量化容器引擎isulad
1.安装并配置isulad
打开openeuler后,首先输入
[root@localhost ~]# yum install -y iSulad安装完openeuler后,输入启动isulad
[root@localhost ~]# systemctl start isulad然后修改配置文件,这样才能在后续创建镜像时拉取到镜像
cp /etc/isulad/daemon.json /etc/isulad/daemon.json.originvim /etc/isulad/daemon.json在打开json配置
文件后,将registry-mirrors项添加镜像库"hub.oepkgs.net",具体如下,不要忘记最后的逗号。
"registry-mirrors": [
        "hub.oepkgs.net"
    ],
修改完后,先按Esc退出编辑模式,再输入:wq 保存
输入以下重新启动isulad
systemctl restart isulad
以上操作不需要专门设置文件,也就是不需要在自创的目录中使用,直接在localhost操作即可。后面如果没有特意声明,也都是在local host下即可使用
测试可否拉取镜像
[root@localhost ~]# isula pull openeuler/openeuler:24.0924.09是我下载的版本,诸位可根据自己下载的版本修改
输入以下,查看已经拉取的镜像
[root@localhost]# isula images
REPOSITORY                     TAG        IMAGE ID             CREATED              SIZE

openeuler/openeuler            24.09      34f56f4bfb72         2024-11-30 12:27:37  506.641MB
2.创建容器
输入以下,创建openeuler容器
[root@localhost ~]# isula create -it openeuler/openeuler:24.09输入以上代码后,会出现该容器的id,也就是下图的name

启动容器,这里的数字可以缩小到两位,系统会自动匹配容器id
isula start 5753进入容器
[root@localhost ~]# isula exec -it 5753 /bin/bash查看容器相关数据
[root@57538020c8d5 /]# cat /etc/os-release输入cd退出
3安装isula-build
输入以下
yum --enablerepo update install -y isula-build查看状态
# systemctl status isula-build.service4.安装docker-runc
在24.09版本中,安装docker-runc不需要带docker-,如下。输入docker-runc会显示没有docker-runc的匹配项,在20.09版本应该可以输入docker-runc。runc将保障后面的.sh文件的运行
yum install -y runc5.构建自己的镜像
首先需要创造构建目录
# mkdir –p /home/test/ && cd /home/test/以下操作均需要在test目录中完成
构建Dockerfile文件
[root@localhost test]# vim Dockerfile进入insert状态后输入以下,在这一步注意,如果你之前拉取镜像的时候出错,后面构建镜像时会在step2出错,而且注意在镜像名前加上hub.oepkgs.net,否则也会报错。
FROM hub.oepkgs.net/openeuler/openeuler:24.09
COPY hello.sh /usr/bin/
CMD ["sh", "-c", "/usr/bin/hello.sh"]
按Esc退出编辑模式,再输入:wq 保存
使用# cat +文件名可以查看文件内的代码,如# cat Dockerfile
构建hello.sh脚本
[root@localhost test]# vim hello.sh输入以下
#!/bin/bash
echo echo "hello, isula-build!"
退出后修改hello.sh的属性
[root@localhost test]# chmod +x hello.sh查看是否完成文件的构建
[root@localhost test]# ls -l输入,构建镜像,结果如下
[root@localhost test]# isula-build ctr-img build -f ./Dockerfile -o isulad:hello-isula-build:v0.1 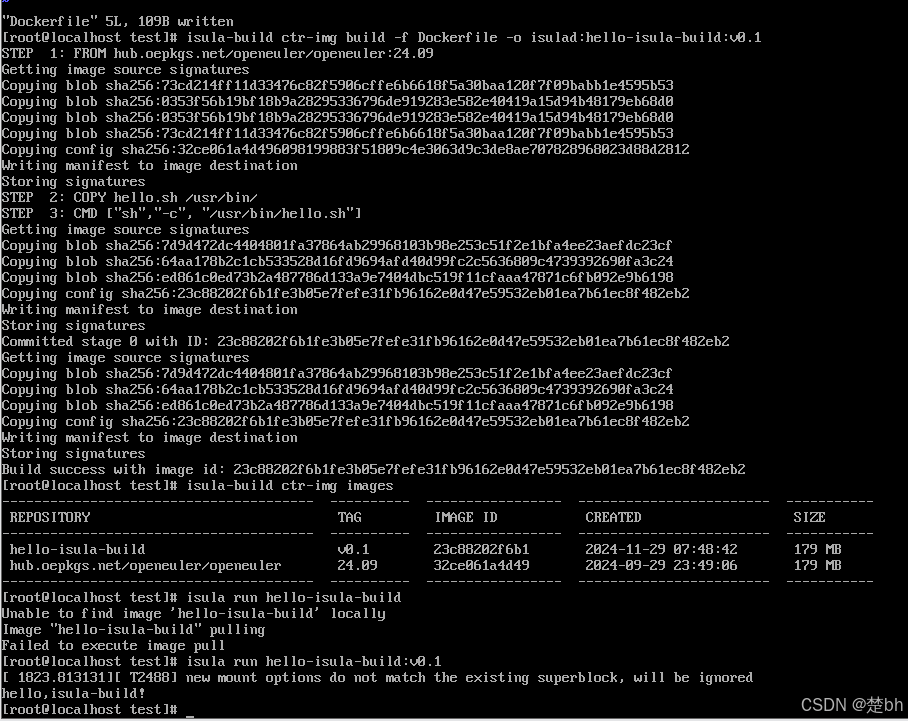
输入以下,查看创建的镜像如上
[root@localhost test]# isula-build ctr-img images构建完成,下面运行构建好的镜像。结果如上
[root@localhost test]# isula run hello-isula-build:v0.16.
学校的操作系统课设好恶心,主要是openeuler的isulad教程不算多,docker的教程倒是不少,在安装runc和编辑Dockerfile的镜像名字总是报错,给我搞红温了,希望对各位有帮助。

鲲鹏昇腾开发者社区是面向全社会开放的“联接全球计算开发者,聚合华为+生态”的社区,内容涵盖鲲鹏、昇腾资源,帮助开发者快速获取所需的知识、经验、软件、工具、算力,支撑开发者易学、好用、成功,成为核心开发者。
更多推荐
 9
9 0
0- 0


 已为社区贡献1条内容

所有评论(0)